
Hi Everyone!
We have something a bit different for you today. We will talk you through the renovation of our Showroom Manager’s renovated 1969 Glendale Camper, complete with an Avondale Kitchen Reface. Enjoy!:
——————–
Last year I purchased a 1969 Glendette Camper, with the hopes of remodeling it into the perfect glamper. After a year (a long break in the winter!), it is almost complete.
Let me start off by showing you the before photo. It was a bit rough, but overall the bones seemed like they could have potential. I picked up this trailer from kijiji, for $800.00, and hauled it home:

Inside, the floors and cabinets were dark and dingy. The first step was to repaint all walls and remove doors.

Bobae loved helping with all of the details!

After the base of the interior was painted, it was time for the new floors. You can see that part of the floor was uncovered.

We decided to call in the big guns and have Tile your World come in and lay the new floor. It took him a few hours, and it made all the difference.

Here’s a little side by side before and after of the old and new floor:

The best thing about the new floor? You can’t see the dirt!!

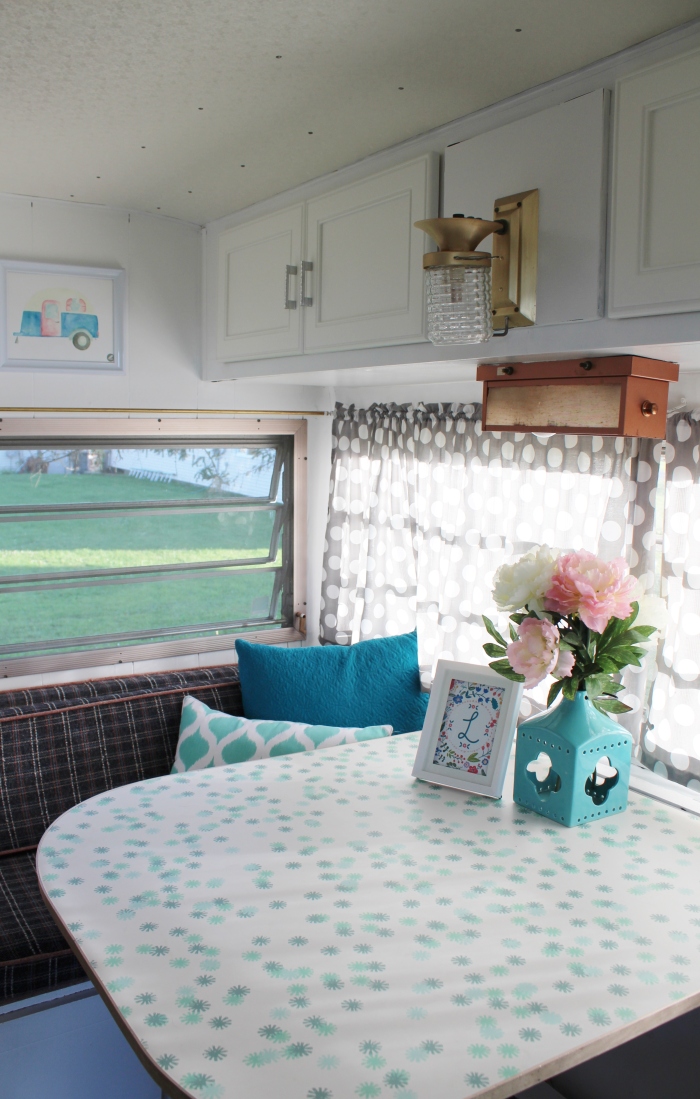
After the floor and painting were complete, it was time for the fun part! I put together a few samples, to try and come up with a theme, or direction of the project. Grey and white polka dot for curtains, a teal pattern for cushion covers, the chosen flooring, and soft pastel accents. The name of the game? Soft, girly and clean.

We removed the existing counter, sink, range, and propane heater, and replaced with a straight run of countertop. I chose a Wilsonart laminate that came straight from the mid-century vault, to add to the charm of the original era.
I chose a chateau style door to replace the original doors and give the look of a refaced kitchen. We swapped out the original light and replaced with a pretty mini-chandelier.


As you can see in the photo above, I have one more drawer front to install, but I was just too excited not to share the progress already!
We replaced the laminate on the kitchen table with the same as the main kitchenette:


I chose a sparkly, yet durable handle for the doors, to add some shine and glam!

The closets and storage section of the camper originally consisted of smaller doors, but we swapped them out for full length doors for a streamlined look:


What a difference a coat of paint can make!


I printed off some free printable art onto card stock and framed with dollar store frames to add a bit of a welcoming touch as you enter:

Now that the inside was complete, it was time to move to the outside!
All of the metal strips and screws were rusty and dirty. We wiped them all down really well, taped them off, and sprayed with a Armor Coat rust paint. It made a HUGE difference.


After all of the metal was covered, it was FINALLY time to paint the exterior! We cleaned the entire camper with soap and water, then let it dry over night.
I chose a plain white exterior paint, and 2077-40 Spring Azalea for the stripes.


How exciting! We’ve taken her out three times now, and every time we sit in awe and say “I LOVE this camper!”

Happy camping everyone!

_________________________________
Are you ready for your dreams to come true? Give us a call today or stop in for a factory and showroom tour. We have designers in your area every week, from Grand Falls to Saint John!
317 Lockhart Mill Road, Jacksonville (Woodstock), NB, Canada
1-506-328-4111/www.AvondaleKitchens.com/jim@avondalekitchens.com

I totally love this makeover! Real life and relevant.
Thank you so much Roxanne! It was a lot of fun doing it!
Great job! Love it and I am sure you will enjoy and appreciate it so much more knowing you did it yourself. What a fun project. Thanks for sharing.
Thank you! Yes it was a wonderful, and fun project to take on. Thanks for reading!
Wondering if you put a stove back in. It looks awesome!!!
We didn’t put the stove back in. We opted for the extra counter space, and use a hot plate, a toaster oven and a camp stove to cook now 🙂
Wow what a sweet transformation, is is so bright and fresh looking…. I would love to have something like this to travel in.
Thank you so much! It was a great way for us to own a “custom camper” for a very low price! 🙂
You did a fantastic job!! It looks so good and so much satisfaction from doing it yourself!! Have a great camping season!
Thank you Theresa! We’ve had an excellent camping season thus far! 🙂
Beautiful! You did a great job.
Thanks so much Wendy!
Beautiful, but where did the stove and sink go?
Hi Linda,
We took out the sink because of damage to the piping, and carry a wash basin to fill up when needed. We opted to remove the stove and use a toaster oven and hot plate when needed to maximize the counter space even more 🙂
Wow! That is lovely…you did an awesome job.
Thank you Barbie! 🙂
We have a 33ft travel trailer that I would love to do next spring! Thanks for sharing and now I have some ideas I can go with.Just beautiful!!
Thank you Sylvie! We’d love to see pictures after you do your reno!